Hallo all,
I'm unable to maintain this blog really...
I'm kinda dodging between places. So if you wanna check out my stuff please head on over to
https://www.facebook.com/gardensofmay
or
http://gardensofmay.deviantart.com/
Thursday 22 November 2012
Saturday 1 September 2012
Wow, how long as it been?
It's been so long since I have posted anything here and to be honest it was because I lost a lot of my motivation but I'm slowly getting it back. I have been cooking and baking quite a bit but my desire to blog about it has waned a little bit I think it's slowly coming back.
Just returned from a week long holiday in Queensland which was absolutely rejuvenating and am ready to get right back into it. :)

The last thing I cooked which I'm really proud of would be when I was living in the gold coast and I had very limited resources as we didn't want to buy too much. We were basically living in each apartment for two to three days and we went from apartment -> resort -> apartment so any ingredients pretty much had to be used in each residence we stayed in as there wasn't anywhere in the resort to store cooking ingredients.
Basically, scrambled eggs and a mushroom with bacon and egg baked into it. And a light orange and apple fruit salad to end the morning with. It was nice and light and refreshing and was really cheap to make all together.
Monday 13 February 2012
Stew!
It's been a while since I've made any posts here and honestly, I haven't been much in the kitchen lately. I was supposed to make biscuits for Valentine's Day and make a post about it here but I never got around to it as I was sitting behind the sewing machine all day. It's okay, the boyfriend didn't mind.
I also never posted the pineapple biscuit or peanut biscuits that I made for Chinese New Year but oh well! Today I bring you stew!
I went out to the shops and got some ingredients to make a tomato based stew because for some reason, that's what I felt like eating. I also had the tastiest stew at my boyfriend's house the other night so I was craving for more.
 So this recipe started with two 800g cans of diced tomato, two capsicums, an eggplant, three zucchini, an onion, a lot of garlic, a bottle of sundried tomato pesto and some lamb. Not in that image that I also used was some EVOO, salt, pepper and flour.
All I did was coat the lamb in salt, pepper and flour and dice up all the vegetables. Then I browned the lamb in the EVOO and removed it from the pot. Cooked the garlic with the onion until it was all softened and then put everything into the pot and cooked it for a while before I decided to stick it all into an oven proof dish and put it in the oven. At this point I had seasoned the pot with salt, pepper and some sugar.
The main reasoning for the oven is because I didn't want to stand there watching over it and stirring it every so often, I wanted to go to my room and sew. So I put everything in the oven for two and a half hours, stirring every half an hour.
After that was done, it hadn't reduced as much as I wanted to so I returned it back onto the stove for a while until it thickened. And then served over rice.
This amount makes you a REALLY BIG pot that you'll be able to eat for a week. :3

I also never posted the pineapple biscuit or peanut biscuits that I made for Chinese New Year but oh well! Today I bring you stew!
I went out to the shops and got some ingredients to make a tomato based stew because for some reason, that's what I felt like eating. I also had the tastiest stew at my boyfriend's house the other night so I was craving for more.

All I did was coat the lamb in salt, pepper and flour and dice up all the vegetables. Then I browned the lamb in the EVOO and removed it from the pot. Cooked the garlic with the onion until it was all softened and then put everything into the pot and cooked it for a while before I decided to stick it all into an oven proof dish and put it in the oven. At this point I had seasoned the pot with salt, pepper and some sugar.
The main reasoning for the oven is because I didn't want to stand there watching over it and stirring it every so often, I wanted to go to my room and sew. So I put everything in the oven for two and a half hours, stirring every half an hour.
After that was done, it hadn't reduced as much as I wanted to so I returned it back onto the stove for a while until it thickened. And then served over rice.
This amount makes you a REALLY BIG pot that you'll be able to eat for a week. :3

And is so very very tasty! But if you're sharing with other people you might be fighting over the meat. ;)
Sunday 29 January 2012
Poor neglected journal~
There hasn't been much work done on this journal since the last few weeks as I have ben busy preparing for WaiCon. I had baked so much food upcoming to waicon, my Popcorn flavoured macarons got reprised (Thank you Adriano Zumbo), Brioche, Walnut bread, Melon Pan, kaya and a lot of other things have been made for people to eat on Australia Day/my friend's birthday as well as during the convention itself. I was a part of running a store with some friends and I wanted to ensure that they had food to snack on throughout the day.
It was a wonderful albeit tiring experience and I'm looking forward to doing it again next year. Unfortunately I didn't take pictures of any of the food that I had made so there's nothing to show for all the work I have done in the past few weeks but there will be pictures and possibly recipes coming up in the next few entries for everyone so please look forward to that.
A great experience I had over the weekend however was somebody had noticed the macarons I had left our during the convention for people to snack on and I was hunted down and possibly befriended. That was kind of cool. :)
Anyway, I hope everyone's looking forward to this coming year and all the food related experimentation that I'm going to be doing. I've decided that if I'm going to be posting recipes on this website, it's going to have to follow 2 rules. If they're recipes that I learnt off friends/family or off the internet then I shall post them up here because they are freely sharable but if they're recipes that I learnt from a book that I have purchased then I will be directing people to purchase that book. I'm not going to be posting up those recipes.
I think that's pretty fair. And onwards on my journey towards culinary dreams. Recently I've been watching a lot of Top Chef. It's one of my favourite cooking series of all time!
Tuesday 13 December 2011
Chocolate Mug Cake
Yup, mug cake. That is totally not a typo. Tonight I had felt a really strong urge to have chocolate cake. Part of it is because this coming Thursday I'm finally getting out of my house and going out to a restaurant. It'll be the first time I'm leaving my house since I came back from hospital so I was very excited. Looking over the menu of the venue we're going to I got this intense craving for turkish bread and chocolate cake.
Unfortunately my cravings for turkish bread and dip is left for another day. I was, however, able to satisfy my cravings for Chocolate cake thanks to Not Quite Nigella and pictures from Lucas (who blogs at CoverVersions).

1/2 Teaspoon coffee powder (I left this out but it'd be nice for people who want a nice kick, up the quantitiy a little if you want to make a mocha cake)
pinch of salt
3 Tablespoons milk
3 Tablespoons oil
3 Tablespoons chocolate chips (in this part, I cut up two and a half rows of cadbury dark chocolate)
Splash of vanilla extract
1 egg
Method
 1. Combine all of the ingredients into a bowl from the top of the list to the bottom of the list. Make sure you combine all the dry ingredients well before you start putting in the wet ingredients, just helps a little to make sure everything is distributed.
2. Cover the cup with glad wrap.
3. Microwave one cup at a time. Start off with just 1 minute and if it doesn't spring back when you poke it, go for another 30 seconds.
That is all you have to do to make a tasty tasty mug cake! I ate it just as it was but I'm sure it'll be even tastier with ice cream or whipped cream. But it was really decadent as it was for me. I felt a little bit sick after eating a whole cup...it would be perfect for me to share with someone! But this recipe makes two so if you love decadent, here you go!
Unfortunately my cravings for turkish bread and dip is left for another day. I was, however, able to satisfy my cravings for Chocolate cake thanks to Not Quite Nigella and pictures from Lucas (who blogs at CoverVersions).

I made a chocolate cake in a mug and it was really strangely very very tasty. So let's get down to the main part of this post so you can all have a recipe to turn to on those nights you feel like cake but you're too lazy to actually bake one. This recipe takes 5 minutes from start to finish (finish being washing up done and eating cake) so it's really worth it on certain nights you want to eat hot tasty cake really quickly.
I didn't even measure these ingredients out properly, I just used a big spoon from my drawer and roughly estimated everything. :3
Ingredients
4 Tablespoons flour
5 Tablespoons Sugar
2 Tablespoons Cocoa powder
1 Teaspoon baking powder1/2 Teaspoon coffee powder (I left this out but it'd be nice for people who want a nice kick, up the quantitiy a little if you want to make a mocha cake)
pinch of salt
3 Tablespoons milk
3 Tablespoons oil
3 Tablespoons chocolate chips (in this part, I cut up two and a half rows of cadbury dark chocolate)
Splash of vanilla extract
1 egg
Method

2. Cover the cup with glad wrap.
3. Microwave one cup at a time. Start off with just 1 minute and if it doesn't spring back when you poke it, go for another 30 seconds.
That is all you have to do to make a tasty tasty mug cake! I ate it just as it was but I'm sure it'll be even tastier with ice cream or whipped cream. But it was really decadent as it was for me. I felt a little bit sick after eating a whole cup...it would be perfect for me to share with someone! But this recipe makes two so if you love decadent, here you go!
Thursday 8 December 2011
Pandan Panna Cotta with Mango Puree

Cooking counts as rest, right?
For the first week, I lay in bed and watched Top Chef and played some video games but the urge to create things was quite high so naturally, I decided to listen to those urges. I didn't feel up to taking on the Daring Bakers/Cooks challenges for this month as that would require me to ask someone to help me purchase ingredients, so I decided to just play with some flavours on my own and make a panna cotta.
Mangoes are now coming in and they're as tasty as ever so who could resist making a slightly more asian inspired green panna cotta?
Photography is courtesy of a good friend of mine and you can see much more of his work right here.
So without much further ado, have the recipe and off you go. I hope you all enjoy.
Makes about 15 little jars of panna cotta.
Ingredients:
1L Pouring Cream (it will say 35% fat content on the bottle)
100g Sugar
2 tsp pandan essence (find this at any asian grocery store)
12 Gelatin leaves
1L cold water
2 mangoes

1. Soak the gelatin leaves in the cold water for about ten minutes. When done, squeeze gently to remove any excess water and put into a mixing bowl. While you're waiting for the soak, you can complete the rest of the cream steps.
2. Place the cream and sugar into a pot and stir over a very low heat until the sugar has melted. In this step bring up the heat very gently until it's lukewarm. When I took the pot off the stove, I was able to hold the pot in my hands without any worries.
3. Pour pandan essence into the cream mixture and stir in a little. Don't need to be thorough here, there is much more stirring to be done.
4. Pour the cream mixture over the gelatin leaves and start stirring. Make sure all of the gelatin leaves dissolve and incorporate here. If you're finding it a bit difficult, put it back onto the stove on a very low heat, you don't want the cream to cook in any way so be very careful with the heat.
5. When that has all been mixed in, I strained the mixture into another bowl just to make sure all the gelatin was fully dissolved.
6. Spoon mixture out into individual jars and put in frige to set for a few hours or overnight.
7. Dice up the two mangoes and puree half of it. I also added two tablespoons (roughly) of cream in with the mangoes as I pureed it. This removed a little bit of the tartness of the mango but you can skip that if you want, a little tart flavour would compliment the sweet panna cotta very well if that's a flavour you enjoy.
8. Combine the mango with the puree and spoon over the set panna cotta.

Saturday 12 November 2011
Povitica Beginnings
This was a challenge that was put forth to me by lokified of CoverVersions. He had come across a recipe from Not Quite Nigella and had wanted me to test out a recipe. It turns out it was last month's baking challenge which I have now signed up for and am going to attempt to participate in every month. Now, the images I'm going to have below all have timestamps, this comes from a habit of mine to timestamp everything just in case I decide to scrapbook photos later and I forget dates so from now on after this I'm going to try and make a bigger effort to turn off the timestamping on my camera before I start taking all these photos.

I'm going to serve that apple loaf that I made here warmed up and with a side of custard, it will be more like an apple pudding than the loaf of bread that it should be but still just as tasty.
Povitica - makes three loaves, two with a walnut filling and one with an apple cinnamon filling.

To Activate the Yeast
7g Sugar
3g plain flour
90ml water
11g dry yeast
Dough
360ml milk
128g sugar
18g table salt
3 large eggs
90g unsalted butter
840g to 1kg flour (the amount of flour will vary)
1. To activate the yeast, combine all of the above ingredients into a bowl and cover with cling wrap. Stand while you weigh up the rest of the ingredients.
2. In a medium saucepan, heat up the milk to just below boiling point (about 82C) stirring constantly so that a film does not form on the surface. Then allow to cool slightly (to about 43C) while you measure out the rest of the ingredients.
3. In a large bowl, mix the scalded milk, sugar and salt until it's well combined.
4. Add the beaten eggs, activated yeast, melted butter (allow it to cool before you pour it in otherwise it'll burn everything else) and about 1/4 of the flour.
5. Blend thoroughly and slowly add the remaining flour just enough so that the mixture comes off the side of the bowl.
6. Pour the dough mixture out onto the bench and knead while adding the rest of the flour. This is where the flour will vary. The amount of flour you use will be dependent on a few things such as the temperature of the room around you, the warmth of your hands (if the rumors I hear are correct and my hands are very very warm), the type of flour you use and other factors. Just keep mixing flour in small amounts until the dough is no longer very sticky, it will still be a little bit sticky but not so sticky that it smooshes to everything. A scraper is very handy in this step as well.
7. When you've reached a point where it's kneadable without it being too sticky, just keep kneading until the transparent window test tells you to stop. What I mean by this is, you should be able to gently spread the dough between your fingers so that it's almost transparent and you can see the lines of gluten form.

It's a little hard to take a picture of it with one hand but that's kind of what you're looking for. You should be able to just see the surface behind it and if you pull a little bit more you'll be able to see strands in the dough.
 8. Divide the dough into three pieces and place onto a kitchen bench with a very lightly dampened towel over it. Leave for about one and a half to three hours (depending on the temp of where you've left it) until it has risen to twice its size.
While you're waiting for the dough to proof, you can make the fillings from the recipes below.
9. The next step is to roll out the dough. Use flour very sparingly in this step. The aim is to roll the dough out as thinly as possible without tearing it. After you've managed to roll it out, brush a little bit of melted butter over the top and spread the fillings over.
 What you see here is my overloading my bread dough with an apple filling. It should roughly be just a little over half this amount. The recipe that you have at the bottom is the adjusted amount so you don't have to worry so much about this. Some tips in regards to this would be to cut the apple up into really small pieces or to puree the mixture. The next time I try this recipe out I'm going to try it out with an apple puree to see if I can get a smoother pattern. After I spread the apply out on the dough, I covered it with some cinnamon and brown sugar. The image that you see below is the walnut filling spread out on the dough and the end of the rolling up process.
10. When you've finally finished rolling it up you'll get a long tube kind of like if you've rolled up a roll of sushi. You just coil it up and place it into some well oiled bread tins at this point.
 I do agree, they look very disturbing when they're in the bread tins like that. I try really hard not to think about what they look like, I'd rather not think about it. But let them sit in the bread tins for about an hour or two so that they have time to proof again and rise a bit more. You want it to have this final proof so that the bread comes out really nice and fluffy.
11. Brush the tops of the bread with a beaten egg and then pop it into the oven at 180C for about 15 minutes. Then turn the oven down to 150C and bake for a further 30 minutes. At this point check the tops, if it's really golden then you should cover the pans with aluminum foil or turn off the top element of your oven. Then bake for a further 15 minutes.
12. Remove from oven and leave in the tins for another half to an hour so they cool slightly and then turn out the loaves and let them cool completely before slicing into them.
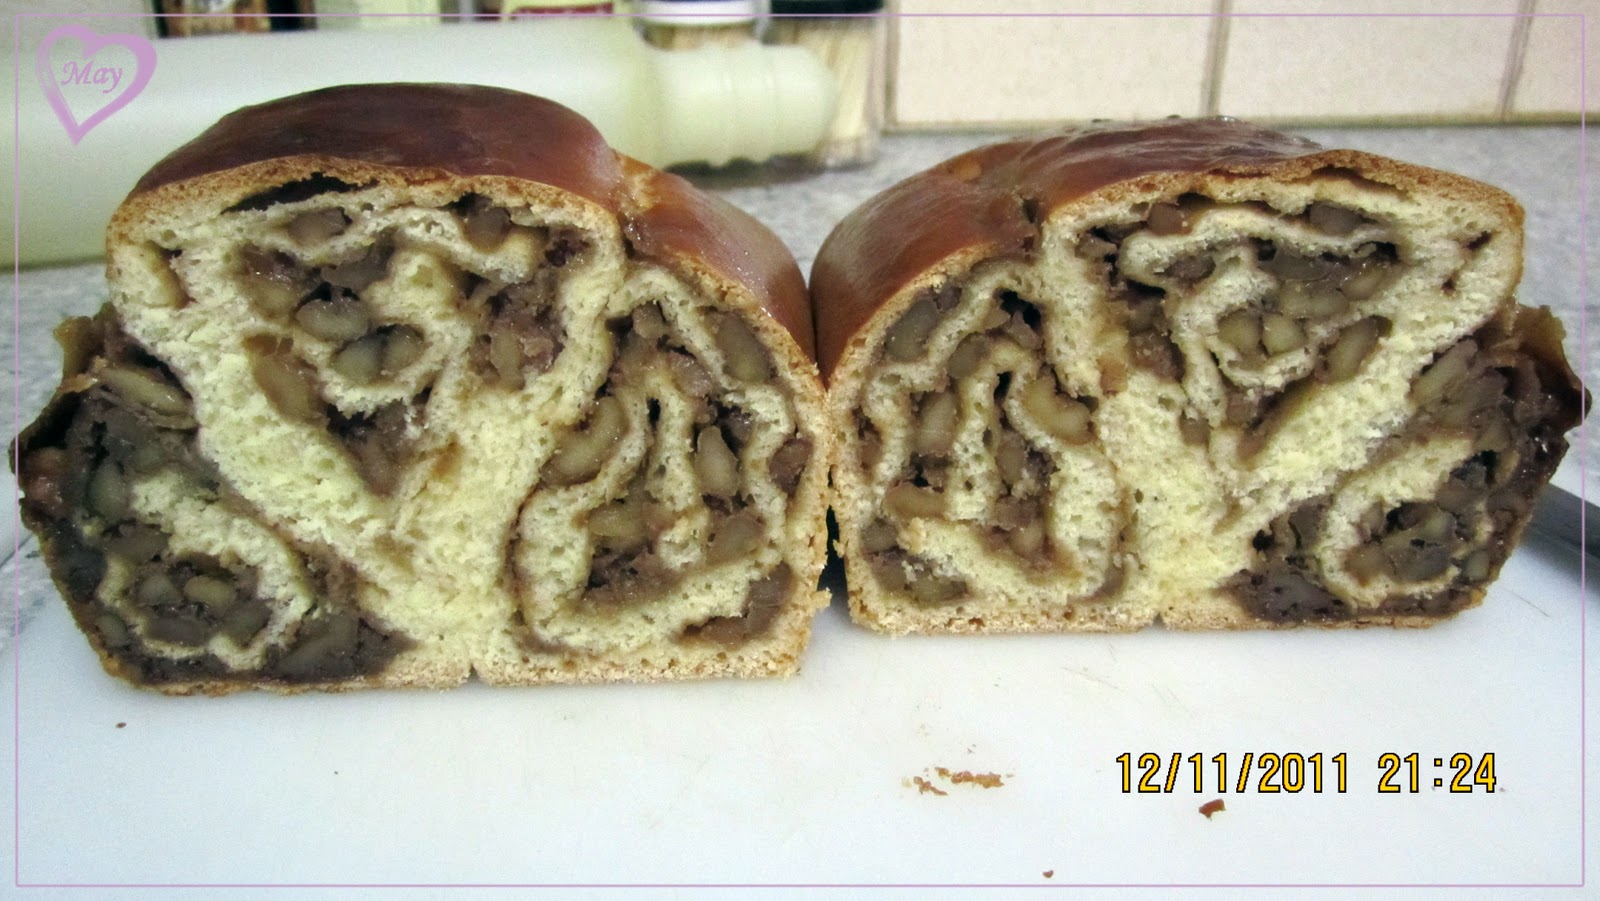
And such you have your beautiful walnut povitica. The apple one didn't turn out quite as pretty because I definitely overloaded it with a lot of apple. To get the swirl pattern a lot neater, I would suggest dicing up the walnut a bit finer than I did.

You can see here that the apple was definitely overloaded. It did really turn out to taste more like a baked apple pudding even though you could slice it like a bread. It still turned out really tasty however, despite it's pudding type texture.
And now for the filling recipes. The apple recipe here has been adjusted so that it's less of an overkill like my loaf was.
Walnut filling - suitable for two loaves
560g walnuts
120ml milk
115g butter
1 large egg
1 tsp vanilla extract
225g sugar
1 tsp cocoa powder
1 tsp cinnamon
1. Mix together the walnuts, sugar, cinnamon and cocoa.
2. Heat up the milk and butter until the butter has completely melted and the mixture is beginning to boil.
3. Pour the liquid over the nut and sugar mix and combine.
4. Add the eggs and vanilla to the mixture and mix thoroughly.
5. Allow to stand at room temperature, if the mixture becomes too thick you can thin it back out with a small amount of warm milk.

Apple Filling - enough for one loaf.
4 large apples
3tbs flour
150g butter
1. Cook all of the above ingredients in a large pan until the apple is softened and the mixture thickens.
2. Stir in 3tsp ground nutmeg into the mixture.
3. After spreading onto the dough, scatter a layer of cinnamon and brown sugar over the top for extra tasties.
That is my first adventure into povitica. I hope you have enjoyed it just as much as I have!
Subscribe to:
Posts (Atom)